|
What
is Audio Recorder ?
Audio Recorder (Pro and Platinum version)
is a useful audio recoding tools and it can help you to
record sound to MP3, OGG or WAV files easily and quickly.
<Top>
How
to order Audio Recorder Pro or
Audio Recorder Platinum
?
Please click
here to order
Audio Recorder versions.
<Top>
Is there any limitation of recording length if I registered the
product?
No, you can record as long as you
want with registered copy, of course, provided you have enough free disk
space.
<Top>
Feature
comparison of Audio Recorder versions
Audio Recorder has two versions: Audio
Recorder Pro and Audio Recorder Platinum. Audio Recorder Platinum is the
advanced version of Audio Recorder Pro
and provides more powerful features besides
the features in
Audio Recorder Pro.
The major difference of the two versions
is that Audio Recorder Platinum provides a special record mode - EZ
ALL-Record Mode, and all audio is recorded through its virtual audio
driver directly in real time, without a quality loss. Furthermore, it
can record and mix the Microphone input in the meantime, and be able to
record VoIP calls on softphones (eg. Skype)
or instant messaging audio (eg. Messenger).
|
Feature Overview |
Pro
version |
Platinum version |
|
Auto. Record Scheduler |
 |
|
|
Voice Activation Recording |
|
|
|
Record Preview & Monitor |
|
|
|
Record Mode |
|
|
|
-
Normal Record
Mode |
|
|
|
-
EZ
ALL-Record Mode |
- |
|
|
Record VoIP calls |
- |
|
|
Advanced Record |
|
|
|
- Real-time filters (Low/High
pass, Notch) |
|
|
|
- Automatic Gain Control (AGC) |
|
|
|
Mute Audio Output while Recording |
- |
|
|
Multiple Soundcard Support* |
- |
|
Note:
*: With Multiple Soundcard support (includes USB sound card)
feature, you can record through one sound card and monitor the recording
another sound card.
<Top>
How
to use
Audio Recorder
?
For Audio
Recorder Pro:
Audio Recorder Pro
is a powerful tool to help you to record music and sound to MP3,
OGG and WAV
files and designed to record any
sound from your sound card.
It is fast and very easy to use:
For Audio Recoder Platinum:
Audio Recorder Platinum is the advanced version of Audio Recorder Pro
and provides more powerful features besides the features in
Audio Recorder Pro:
<Top>
How to convert / save cassette to CD,
vinyl records to CD?
You need a cable to connect the output of your
cassette / vinyl records player
to the audio input of PC. Please refer the steps below:
1. To connect the player to PC, please first check whether there is any audio output port on your player, for example, such as Line-Out, Audio-Out or Headphone/Speaker Output, etc. Then, connect it to the audio
input on your PC (normally, the audio input is usually a 1/8" mini-jack on the back panel,
labeled Line-In or Aux).
2. Start Audio Recorder Pro (or
Audio Recorder Platinum)
and select the appropriate recording source from the list. The names of the sound sources differ from one system to another, it is usually named as
Wave, Stereo Mix, or something in similar wording.
3. To verify the connection and recording source selected, please play a
cassette / vinyl record first. If the correct source is selected, the record level indicator should be synchronized with your voice (please adjust right-side volume control to appropriate level), otherwise please try other connection port or recording source.
4. Click 'Start Record' button to start recording. Click 'Stop' button
(you can pause recording by click 'Pause' button) at any time to stop the recording,
and you should have a audio file (e.g. MP3, WAV) recorded on your hard
disk.
5. Now, you can use any 3rd party CD burn software to burn the audio file
to a CD, for example, Windows Media Player has a build-in cd burn feature
and is able to burn the record audio file to CD (Windows Media Player is
provided by Microsoft, and it is free).
For Audio Recorder Platinum, you can use
EZ ALL-Record Mode to record as well, especially when you sound card
doesn't provide a recording source as required above. Please click
here to learn more about EZ
ALL-Record.
IMPORTANT:
If your player doesn't have audio output connectors other than for headphones or speakers, please make sure to set the volume control on the device at zero first before you connect the headphones or speaker output to the computer.
<Top>
How to save my recording to CD?
Audio Recorder Pro (or Audio
Recorder Platinum)
can help you to record your audio to an audio file (e.g. MP3, WAV) on your
hard disk. Then, please use any 3rd party CD burn software to burn the
audio file you recorded to a CD, for example, Windows Media Player has a
build-in cd burn feature and is able to burn the record audio file to CD
(Windows Media Player is provided by Microsoft, and it is free).
<Top>
How to record VoIP calls (eg. Skype) or instant messaging audio (eg.
Messenger)?
You can easily record VoIP calls or
instant messaging audio by using EZ ALL-Record Mode provided by Audio
Recorder Platinum.
1. Close the applications for
recording (eg. Skype, Messenger).
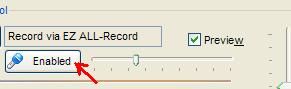
2. Launch Audio Recorder Platinum, switch to EZ ALL-Record Mode
(click the tab 'EZ ALL-Record', or click the 'Device' Button and
select 'Record through EZ ALL-Record').
3. Click the button with microphone icon to record both side audio
of a conversion (you can adjust its volume on the right side of the button).
4. Start the applications for recording (eg. Skype, Messenger).
5. Now you are ready to record your conversion - click 'Start
Record', make a call.
Please kindly note that you may have to
restart the applications (eg. Skype, Messenger) after you quit EZ
ALL-Record Mode. Please click
here to learn more details.
<Top>
How
to set up the recording sources on Windows Vista and Windows 7?
Some of recording sources (for example Microphone, Stereo Mix, etc.)
might be disabled by default on Windows Vista and Windows 7. To view or enable them
for recording, please follow the steps below (Some
devices will be blocked and can NOT be used for recording while
the recording devices window is running. Please remember to
CLOSE the recording devices window once done):
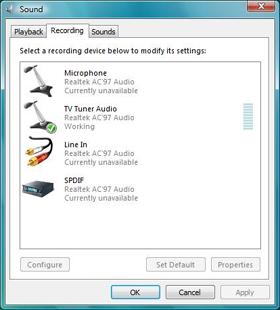
1. Click the speaker button
(just on the right of the device list box), select 'Open Windows Recording Devices'.
You can view all current enabled recording sources in the recording devices
window.

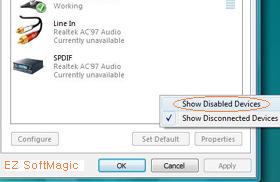
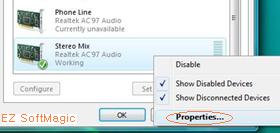
2. Right-click
the blank area in the list, select 'Show Disabled Devices'' from the
pop-up menu. All recording sources (both enabled and disabled) are shown in
the list as below.

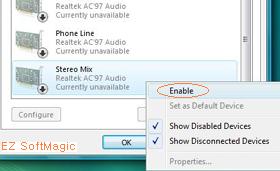
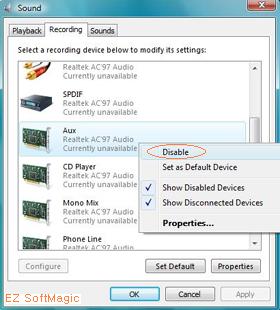
3. To enable or
disable one recording source, just right-click the item and select the
action ('Enable' or 'Disable') from the pop-up menu. You
can click the speaker button (right
near the device list box), select 'Refresh Recording Device List' to update
the changes to
the device list in
Audio Recorder.
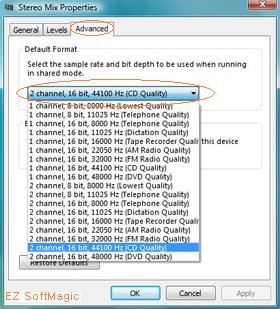
3. To view or modify the
default format of a recording source, just right-click the item and select
'Properties...' from the pop-up menu and select 'Advanced' tab to view or
modify current settings. If you want to record in Stereo, you should select
a format with the attribute of '2 channel'.
4.
Click 'OK' to exit
recording devices window once
done. Now click the speaker button (right
near the device list box), select 'Refresh Recording Device List' to update
the device list.

<Top>
How to set appropriate recording volume?
How does recording level indicator (VU meter) work?
Recording level indicator (VU meter) can help you to set recording
volume appropriately.

Recording level indicator ranges between 0 and 100 (from green to red).
Higher value means higher recording volume. Recording with too low volume
(e.g. less than 30) may cause it hard to hear, and recording with high
volume may cause some distortion. To get the highest possible
performance of recording, the recommended range is between 60 and
90.
You can adjust the recording volume to the appropriate level as mentioned
above before or while recording, by the volume control on Record panel.
If
still having too weak or strong signal by adjusting this volume control,
you may need to launch windows volume control to adjust the master volume
as well (to launch windows volume control, please double-click on the
speaker icon in your taskbar tray at the lower right hand corner of the
screen), normally the master volume is the very left one.
If still having too weak or strong signal even by adjusting the master
volume, you should check the signal level of the input source and adjust
its volume if could.
<Top>
How to set up
multiple 'Auto. Record' schedulers?
Though you can set up only one 'Auto. Record' scheduler in a recorder,
there are two ways below for you to use more than one 'Auto Record'
scheduler:
1. Launch multiple recorders
directly and
set 'Auto Record' scheduler in each recorder separately.
It is quite simple. However, since all recorders share the same
configuration, sometimes it may inconvenient if you'd like to use
and keep different settings of recording.
2.
Launch the recorder under different names
and set 'Auto Record' scheduler in each recorder separately.
Go to the folder you installed the recorder, copy and change the file
name of the recorder (RcrdMate.exe) to other file name(s), for example
RcrdMate-1.exe, RcrdMate-2.exe, ... etc.
Now you can launch them at one time and
set 'Auto Record' scheduler in each
recorder separately. Since all recorders have their own configuration,
it is easy for you to set and keep different settings of recording for each
recorder.
IMPORTANT:
Please note that ONLY one
recording device/source can be used for recording at one time, which
means:
- if you change the recording device/source in any of recorders, it will
take
effects to all other recorders immediately.
- you can NOT set the 'Auto.
Record' schedulers which use different recording device/source but having
recording time overlapped.
<Top>
How to record from Phone Line?
You need a cable to connect the output of your phone and the audio input of PC.
Please refer the steps below to record telephone conversations:
1. To connect phone to PC, please first check whether there is any audio output port on your phone, for example, such as Line-Out, Audio-Out or Headphone/Speaker Output, etc.
If not found, you may need to buy a cable for this purpose (Radio Shack
makes an inexpensive telephone
Recorder Control, Catalog Number 43-1237. This cable hooks in series
with your telephone and has an audio output connector that hooks up to
the Microphone Jack on your computer). Then, connect it to the audio
input of your PC (normally, the audio input on PC is usually a 1/8" mini-jack on the back panel,
labeled Line-In or Aux).
2. Start the Audio Recorder Pro (or Audio Recorder Platinum) and select the appropriate recording source from the list. The names of the sound sources differ from one system to another, it is usually named as
Wave, Stereo Mix, or something in similar wording.
3. To verify the connection and recording source selected, please make a
test call. If the correct source is selected, the record level indicator should be synchronized with your voice (please adjust right-side volume control to appropriate level), otherwise please try other connection port or recording source.
4. Click 'Start Record' button to start recording.
For Audio Recorder Platinum, you can use
EZ ALL-Record Mode to record from Phone Line as well, especially when
you sound card doesn't provide a recording source as required above.
Please click here to learn
more about EZ ALL-Record.
IMPORTANT:
If your phone doesn't have audio output connectors other than for headphones or speakers, please make sure to set the volume control on the device at zero first before you connect the headphones or speaker output to the computer.
<Top>
How to use
Audio Recorder
to record stream audio from Internet or from other applications like Winamp, Media Player, etc?
Audio Recorder (Pro and Platinum
versions)
is a powerful tool to help you to record music and sound to MP3,
OGG and WAV
files and designed to record any
sound from your sound card. Below is the steps to record stream audio from
Internet or from other applications like Winamp, Media Player:
1. Launch Audio Recorder Pro
(or Audio Recorder Platinum)
and select the appropriate recording source from the list. The names of the sound sources differ from one system to another, it is usually named as
Wave, Stereo Mix, or something in similar wording.
2. Start the playback of the stream audio from Internet or other
applications like Winamp,
3. To verify the connection and recording source selected, please first check 'Preview' box to enable preview feature and make a call. If the correct source is selected, the record level indicator should be synchronized with your voice (please adjust right-side volume control to appropriate level), otherwise please try other connection port or recording source.
4. Click the "Record" button. Adjust the volume
appropriately according to the recording level indicator while recording.
5. Click 'Stop' button (you can pause recording by click 'Pause' button) at any time to stop the recording,
and you should have a audio file (e.g. MP3, WAV) recorded on your hard
disk.
For Audio Recorder Platinum, you can use
EZ ALL-Record Mode to record stream audio from internet or other
applications as well, especially when you sound card doesn't provide a
recording source as required above. Please click
here to learn more about EZ
ALL-Record.
<Top>
The "Start Record" button is
disabled so I can not start recording audio. Why?
The 'Start Record' button will be disabled if the record device /
source you selected can not be used for recording.
Firstly, please make sure that your sound card driver has been correctly
installed and configured. Then, please try other device / source
combinations from the list on the 'Record' Panel.
You can also launch windows volume control panel (double-click on the
speaker icon in your taskbar tray at the lower right hand corner of the
screen) for more details of your sound device and source.
<Top>
How to split the original recording to
the separate sections or songs? How to cut off the unwanted portion from
the recording?
Audio Recorder (Pro and Platinum
versions)
is designed for recording purpose, it can work with the other program
"MP3 Splitter & Joiner",
which is specially designed for this purpose. You can download a free
trial at our download center.
If you want remove some pieces from originals, you need firstly locate the
portion(s) you want to cut in MP3 Splitter,
and split to many smaller pieces, then you should load the pieces you want
with MP3 Joiner and merge them back to one
single file.
<Top>
Just installed Audio Recorder Platinum, and none of my other audio
programs are playing correctly.
Please check the current setting of the
default playback device.
1. Close Audio Recorder Platinum
if it is running.
2. Launch Windows Audio Devices: click Start->Control Panel, Open
'Sounds and Audio Devices', select the Audio tab.
3. Check the current setting of the default playback device, and it
should be set to your sound card. If not, please set it back to your
sound card.
4. Once done, close the control panel.
5. Try playing your audio programs again.
<Top>
Audio Recorder Platinum doesn't record my voice while recording VoIP
conversations in EZ ALL-Record Mode.
 To
record your voice of a VoIP conversion, please simply click the button
with microphone icon on EZ ALL-Record panel. To
record your voice of a VoIP conversion, please simply click the button
with microphone icon on EZ ALL-Record panel.
If still having problem, please check
whether
the current settings of microphone is correct: go to 'Settings'
panel of the recorder, click 'Preview, Mic Setting...' to view or modify
the settings (you can click 'Preview device' button to verify your
settings once done).
<Top>
Audio Recorder Platinum doesn't record any audio in EZ ALL-Record Mode.
Check whether the default playback device
is set correctly in EZ ALL-Record Mode:
1. Enable EZ ALL-Record Mode
first.
2. Launch Windows Audio Devices: click Start->Control Panel, Open
'Sounds and Audio Devices', select the Audio tab.
3. Check the current setting of the default playback device, and it
should be set to Audio Recorder Platinum's own device.
If the default device is set correctly
and you are still unable to record audio, please restart the
applications (for example, media player, Skype, web browser, etc.) you
are using for recording. Please refer the 'Introduction
of EZ ALL-Record Mode' for more details.
<Top>
|