 |
Audio
Recorder Pro,
Audio
Recorder Platinum |
|
|
Products | Download | Purchase | Support | Contact us |
|
|
Audio
Recorder Pro,
Audio
Recorder Platinum |
|
|
Products | Download | Purchase | Support | Contact us |
| Home | Audio
Recorder Pro
|
|
||||||||||||
 You can add ('Save As'), update ('Save') and remove ('Remove') recording
quality. In addition, you can reset ('Reset') all recording qualities to the
default. You can add ('Save As'), update ('Save') and remove ('Remove') recording
quality. In addition, you can reset ('Reset') all recording qualities to the
default. Note: 'Enable VBR' is only valid for MP3 format, which means to recording MP3 in VBR (Variable Bitrate) mode. |
Audio Recorder (Pro and Platinum versions) provides powerful timer for you to easily schedule the recording for both start and stop recording automatically. Simply click the 'Auto Record' button, you are able to set following parameter for auto record:
 Auto Start* - Start recording automatically
Auto Stop - Stop recording automatically
Auto Record Output Set the output folder and file name of Auto Record. You can either use the same settings of a normal recording, or define the additional output folder and name. More Auto Record Options By default, Auto. Record feature (both Auto. Start and Auto. Stop) is disabled when the recorder is just launched. You can enable Auto. Record on recorder startup by the option 'Enable Auto. Record on recorder startup'. If you'd like to start Auto. Record immediately without manually click 'Start Record' on recorder startup as well, please check the option 'Start recording immediately with this Auto. Record settings'. If you'd like to set up more than one 'Auto. Record' scheduler, please click here. Note: |
|
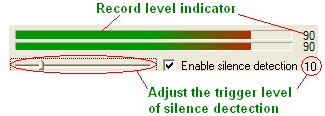
With
'Silence detection' during recording, you are able to start the
recording by level of loudness and pause or even stop the recording for silence.
This option is especially
useful when recording streaming audio and net congestion temporarily stops the stream. Audio Recorder
(Pro and Platinum versions) will just pause and wait for the signal to reappear instead of having a big blank spot in your
recording. Silence Detection Threshold
|
 |
|
Actions if Silence Detected Select a action from the following if a period of silence is detected: - Pause recording during silence and resume recording when the sound starts again - Pause recoding during silence and start a new recording when the sound starts again - Stop recording |
|
4. Preview and Microphone Setting (Platinum version only)
 The 'Preview and Mic. Settings' is for Audio
Recorder Platinum only. You can set the output audio device for preview and
microphone. It is important to close all other audio related applications. The 'Preview and Mic. Settings' is for Audio
Recorder Platinum only. You can set the output audio device for preview and
microphone. It is important to close all other audio related applications.
Output Audio Device for Preview Microphone Connection Once you enabled the microphone input option in EZ ALL-Record mode, Audio Recorder Platinum will record the input from the device you set here. It is strongly recommended to check your settings once done. Just click 'Preview Device' button, and you should be able to hear the Microphone inputs through the output device you selected for preview. |
5. Advanced Record Setting (Platinum version only)
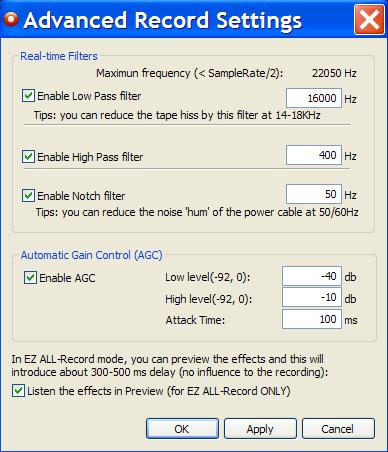 The
'Advanced Record Setting' is for
Audio
Recorder Platinum only. You can enable and set the parameters for
Real-time filters (Low-Pass filter, High-Pass filter, Notch filter) and
Automatic Gain Control (AGC). The
'Advanced Record Setting' is for
Audio
Recorder Platinum only. You can enable and set the parameters for
Real-time filters (Low-Pass filter, High-Pass filter, Notch filter) and
Automatic Gain Control (AGC).
You are able to preview the effects of the settings immediately if Preview is enabled, and even in the recording. Real-times Filters
Automatic Gain Control (AGC) The volume will be decreased if the level is more then High Level (default value: -40db). And the volume will be increased if the level is less then Low Level (default value: -10db). The rate of the volume changing is equal to (20db / Attack Time (default value: 100ms)). Listen the effects in Preview (EZ
ALL-Record mode ONLY) If you do not want the delay in Preview, you can un-check the option. |
L.A.M.E codec is introduced in Audio Recorder (Pro and Platinum versions) for MP3 encoding, all settings for the encoding are listed below and they are only valid when selected MP3 as recording out format:
 Encoding Quality: Encoding Quality: The quality of MP3 encoding, varies from 0 (the best quality and the worst speed) to 9 (the worst quality and the best speed). Type Stereo:: There are four stereo realization for MP3 - Stereo, Joint Stereo, Forced Joint Stereo, Dual Channel VBR Settings:: Click - Coding Method: Total 5 VBR coding methods - Default, Old, New, MTRH and ABR - MAX VBR Bitrate: Maximum Bitrate for VBR coding - VBR Quality: VBR coding quality, varies from 0 (the best quality and the worst speed) to 9 (the worst quality and the best speed). - MAX ABR Bitrate: Maximum ABR/VBR bitrate if ABR is selected as coding method. Varies from 10 to 310 - Write VBR Header: Indicating if VBR header is included to the recording output audio file or not - Minimum Bitrate: Indicating if the minimum Bitrate is enforced or not |
|
To define your own shortcuts, just go to 'Setting' panel and click 'Hotkey Settings'. If you want to reset hot key settings, please click 'Default' button and it will load default settings. Note: |
|
Run recorder on Windows startup The recorder will be started automatically on Windows startup. Minimized as taskbar icon on recorder startup Enable the last record mode
on recorder startup (Platinum
version only) Confirm before restart recording Confirm output file name before recording Show 'Record Competed' window Open output folder when record completed Record Output Folder (on Audio Record panel): |
|
|
||
|
 Audio Recorder
(Pro and Platinum versions)
provides flexible way for you
to
define your own shortcuts for some often used operations (like start/stop record, etc.).
Audio Recorder
(Pro and Platinum versions)
provides flexible way for you
to
define your own shortcuts for some often used operations (like start/stop record, etc.).